Friday, September 11, 2015

LIFE IS GOOD...AT THE LAKE!

Happy Friday!  With the weather cooling down and summer coming to an end it got me thinking about how we spent our time last weekend.  Some very good long-time friends of ours invited us to their lake house to spend time with them and their family.  We had so much fun with everyone!  Being at the lake truly reminds me to slow down every now and then and enjoy life with good friends and family!

The house we were at is designed and decorated perfectly and so my daydreaming of owning a lake house of our own began!  I started looking at pictures of lake houses and their décor.

Isn’t this Kitchen is perfect for a lake house?  Being completely open with large island where everyone can gather around is exactly what I would want.  And I love the contrast of the oversized metal vent hood with the clean and simple painted white cabinets.  Having the slightly rustic and distressed wood floors and ceiling beams help add warmth to the space.  And the iron lantern light fixtures over the island help bring the feel of the outdoors in.  I can totally see myself cooking family meals for my boys in here!


And after dining together we would move into this beautiful Family Room!  I love everything about it from the vaulted ceilings with exposed beams to the shiplap walls to the contrasting stone fireplace.  And the furniture really ties it all together by being light and bright with punches of the darker gray throughout.  And THAT view…it is something that would never get old!


Although I don’t necessarily love things that are overly cheesy or themed I love this weathered oar headboard and could definitely see using it in a Guest Bedroom.  The combination of the different sizes and colors really add interest to the space.


Aren’t these oversized porch swings to die for?!?  These would be a must for the patio in my dream lake house!  I can see myself taking naps here on a daily basis.


Well, now that my daydreaming is over I hope everyone has a wonderful and super relaxing weekend!

Thursday, September 10, 2015

A VIBRANT PLACE TO DINE: THE PHILLIPS DINING ROOM

Over the last couple of weeks I have been sharing one of my client’s homes that I recently designed.  Today is the last installment…their Dining Room.   The house has a Breakfast Room and a Formal Dining Room and during our initial consultation we discussed using the Formal Dining Room as a home office as it better suits their needs as a family.  This means the Breakfast Room is their main space for family meals and entertaining.  Although they selected the Designs Online service for their office, which you can see here, for their Dining Room we went with the full service design option.

Here is how the Dining Room started…plain walls, drapery panels from the previous owners (that are hung way too low if you ask me) and a curvy, iron light fixture.  Definitely time for an update!  Good news is that it has great bones and we got to start from scratch!


With the Dining Room being open to the Family Room they needed to have continuity so to connect the two spaces I continued with the mid-century modern style and vibrant colors.  Here is a picture of the Family Room so you have an idea of what it looks like.  You can check out the full post here.


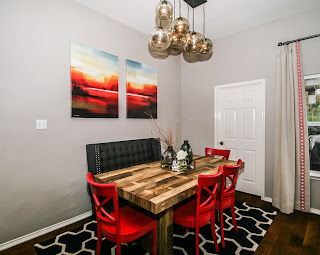
One specific comment from the client was that they wanted a conversation piece in here.  You know…something people will talk about when they are over.  That is where the light fixture comes into play.  I selected this luster glass orb fixture from West Elm.  Ummmm…hello?  If that doesn’t get you talking I don’t know what will!  We did relocate it so it was centered over the table because it just was not practical being in the dead center of the room.


To bring in a rustic, industrial touch I used a distressed wood table (which will also be great for hiding stuff)!  And for the banquette, we opted for a furniture piece instead of a built-in one so they would have options to change it in the future.  The bright pops of color was brought in through accessories, the large art on the wall and the red “X” chairs.  Aren’t they fun and fabulous?!?  And by using the same fabric and trim for the draperies as we did in the Family Room it really ties the two spaces together.


Adding any other furniture would have made the room feel cramped so we added some shelving on the walls to add some weight and bring in some additional accessories.


Here it is one last time.  I just love it and hope the Phillips do as well!


What do you think…would you want to dine in such a beautiful, vivid space?

Tuesday, September 8, 2015

DIY FRAMED WOODEN LETTERS

When my in-laws moved into their new home one of the requirements they had was to have a Guest Bedroom downstairs. One of the main reasons for this was to have a space for our boys when they are over (which is about once a week).  We are lucky that they live super close and we see them a lot!

This room has been a work in progress and they are ready for it to be complete!  There is not THAT much more to be done but the few minor details it does need is wall décor, accent pillows, bed skirts and getting the recently purchased wall unit accessorized. 

For the center of the main wall we are ordering canvas prints of the boys so we wanted something different to hang over the two twin beds.  Although the room is mostly used for the kids they still wanted to keep it classic and not too childish.  So I decided to do a little DIY project for this…and they were trusting enough to let me!  Their names are Oliver and Owen so we decided to hang some framed wooden “O’s” above the beds. 

The main colors are navy, white, gray and a warmer taupe so I started with two large unfinished wooden “O’s” from Hobby Lobby and painted them with navy acrylic paint.


Then we found some simple gray wall frames with a linen mat. 


The letters needed to have contrast with the frames so I decided to use an off-white fabric to put them on.  Then I removed the glass and glued the letters to the fabric-covered backdrop.


I purchased some burlap ribbon and hooks to hang the frames on the wall.


After the ribbon was attached to the back of the frames we hung them on the walls. 


They turned out so cute and add a great touch to the room!  And the hooks are an antique brass, which coordinate perfectly with the nail heads on the upholstered bed!  Once the bedding comes in I will show you the finished room.

Friday, September 4, 2015

TOUCHDOWN!!

Oh how I love this time of year! Not only is it Labor Day weekend (which to me is the beginning of the holiday season) but also kickoff to college football!  At our house we celebrate the first Saturday of college football as though it is a holiday.  We dress in our team gear and cook a BIG breakfast, snack all day and my husband will grill or smoke something delish for dinner.  This year it happens to be a brisket...YUMMY!!

As we have been talking about this upcoming weekend it got me to thinking about sports/football home décor.  Now don’t get me wrong, the Mr. is a HUGE Notre Dame fan but fortunately for me he has not requested to have anything relating to it around our house.  In my search for football themed rooms I have come across mostly nurseries and kids bedrooms, but I have also come across some media rooms, game rooms and a home office.

This game room, with it’s football field floor, is a little over the top for my taste but I’m sure there are plenty of football fans that would love this.  I do think the stadium seats across from the pool table are a great touch.  And if you were able to get some original seats, that would make a great gift for the sports lover in your life!


I am pretty impressed with this Media Room.  It is done quite tastefully and classic in my opinion.  With the neutral colors and patterned wallpaper it really makes the room feel polished.  And the framed jerseys on the walls and signed footballs on the shelves add the perfect “football” touch without going overboard.


And the football helmets in this masculine home office are just enough to not get too carried away with a theme.


And here are some accessories that would not be too cheesy if you were to pull them out for a game day party!

A linen or burlap pillow with your team name would show your team spirit and keep up with the trends!


And instead of doing a cheesy wreath I love the look of this boxwood wreath.  You can just have your team logo on it instead of the monogram.


And I have to say if we are to ever have a sports themed room in our house I will HAVE to have canvas pictures of my boys dressed up in uniforms!  It just doesn’t get much cuter than tiny little kids in sports uniforms!


Do you have any sports themed rooms in your house?  Would you consider a few touches here and there?

Have a great weekend and GO IRISH!!!

Wednesday, September 2, 2015

A MAGICAL TRANSFORMATION: PHILLIPS FAMILY ROOM

When I met the Phillips the first time to discuss their design needs she told me she wanted the make over of her Family Room and Dining Room to be like magic!  She wanted to leave one day and come home to a newly updated space.   Well their twins decided to make an early appearance the week of our installation so she actually ended up getting the “magical” transformation she had hoped for.  And so you know mom, dad and the babies are doing well!!

Last week I shared how they updated their office by using a Virtual Design Board I completed for them and today I am going to show you the new and improved Family Room!  They wanted to make a fresh start in here so we cleared out all of their original things.  Just like the office (see that post here) they wanted a combination of midcentury modern and industrial pieces with fun, bright colors.  And knowing they have two babies and two dogs the room needed to be comfortable and functional.

Here is the original state of the Family Room.  The walls were blank and the drapes from the previous owners were still hanging.


And here is the current state of the Family Room.  Instead of a sectional we ordered a sofa and chairs and updated the arrangement of the furniture by moving the TV to the opposite wall so it was not in front of the windows.


This pillow was my inspiration for the room.  It had amazing colors and the pattern is perfect for their style.
By selecting neutral furniture pieces we were able to add in a lot of fun punches of color throughout the space with the pillows and other accessories.  Since there was a lot going on in the room we also kept the draperies simple with a pop of color and pattern in the trim on the Roman shades.  And OH MY GOSH the gallery wall turned out better than I had planned!  The clock is by far my favorite piece in it though!


So here it is again…the new and improved Phillips Family Room before and after!


What do you think??  I had so much fun designing this room and can’t wait to show you their Dining Room next week!  I hope they are enjoying it!

Monday, August 31, 2015

DIY JEWELRY ORGANIZATION

Happy Monday!  I hope you had a great weekend!  Ours was spent getting several rooms in our house organized which is not always the most fun way to pass the time but always feels great when it is all complete.  We focused on the garage, laundry room and our Master closet.

One thing I specifically focused on was getting my jewelry organized.  In my dream closet I will have glass drawers with lights but for now a budget-friendly project will do!  I have done this project before using cup hooks and dowel rods and it just wasn’t working for me.  Not only was it a pain in the neck to get to most of the pieces, but also the dowels would slip and fall all of the time causing a large pile of jewelry mess on the closet floor.  And you know it always happened when I was running out the door so I never had time to clean that tangled mess up!


So I decided to try something new and a little more creative.  I bought some cork board and small wood slats.


I wanted the background to be a little more fun but not overloaded with pattern or color.  So I decided to paint the cork board in a classic black and white stripe and the wood slats black with small gold dots.


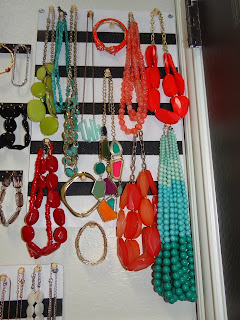
Then I added wooden pushpins and gold nails to hang my necklaces and bracelets on. 


What a difference!!  Everything is so easy to get to now and I love the way the jewelry looks on the black and white backdrop.  It’s such a great addition to the closet and for less than $20 it’s easy on the pocketbook too!  And now I have another thing checked off my list!

Wednesday, August 26, 2015

DESIGNS ONLINE & BACK TO SCHOOL SPECIALS

Oh snap!  Just like that summer is coming to an end.  It’s definitely been a crazy one here!  I have been wrapping up several projects and starting some new ones so I apologize if I have been a little distant lately.  Needless to say I have a lot to share with you!

One major change around our house is that my sweet not-so-baby-anymore Oliver had his first day of Pre-K on Monday and Owen started in the toddler class at the same school. It’s not always fun saying goodbye to summer and having to adjust to school schedules but one great thing about this time of year is the Back to School deals!  At the end of this post I will be offering one myself!

Today I am going to share a before and after of a Home Office Virtual Design Board I completed for the Phillips.  They bought a new home earlier in the year and contacted me to design their Family Room, Dining Room and Home Office.  In the office they wanted some guidance but did not necessarily need me to provide the full service design of installing and accessorizing the space so a Virtual Design Board was the perfect option!

A great way to describe their sense of style is mid-century modern combined with some industrial pieces using fun, bright colors.  They are anything but a boring couple and their style truly expresses it!

Here is the Virtual Design Board I created for their Home Office.


Since the room is directly to your right when you enter their home it definitely needed a punch!  Something to grab your attention!  So I selected a colorful rug and a stencil from Cutting Edge Stencils that is a geometric pattern.  I recommended that they use a dark gray flat paint for the background and use the same dark gray paint for the stencil in a high gloss finish to give it a tone on tone feel.  It needed something but since the rug is quite a statement itself the wall did not need to be too in your face!

Since they both use the office for different purposes we opted for his and hers desks.  They are from the same collection but a larger and smaller version.  And although their twins were only born a few weeks ago, I added a gray table to go in between the two desks so eventually they can use the space as well.

Here are the before pictures of the office.


And now the good part...the after pictures. 


Didn’t they do a GREAT job?!?  I don't always get to see these come to life so I was thrilled to get to see it in person!  And yes…he painted the accent wall himself!!  AMAZING!!

So if you like to DIY but need some design direction a Virtual Design Board is the way to go!  They are also very budget friendly…which is what I’m all about!  And for a Back to School special I will give the first 5 people that sign up for a Virtual Design Board $25 off!  Email me at tessa@interiorsbytessa.com for more information.