Monday, August 31, 2015

DIY JEWELRY ORGANIZATION

Happy Monday!  I hope you had a great weekend!  Ours was spent getting several rooms in our house organized which is not always the most fun way to pass the time but always feels great when it is all complete.  We focused on the garage, laundry room and our Master closet.

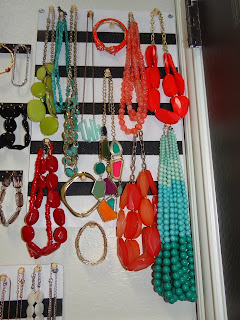
One thing I specifically focused on was getting my jewelry organized.  In my dream closet I will have glass drawers with lights but for now a budget-friendly project will do!  I have done this project before using cup hooks and dowel rods and it just wasn’t working for me.  Not only was it a pain in the neck to get to most of the pieces, but also the dowels would slip and fall all of the time causing a large pile of jewelry mess on the closet floor.  And you know it always happened when I was running out the door so I never had time to clean that tangled mess up!


So I decided to try something new and a little more creative.  I bought some cork board and small wood slats.


I wanted the background to be a little more fun but not overloaded with pattern or color.  So I decided to paint the cork board in a classic black and white stripe and the wood slats black with small gold dots.


Then I added wooden pushpins and gold nails to hang my necklaces and bracelets on. 


What a difference!!  Everything is so easy to get to now and I love the way the jewelry looks on the black and white backdrop.  It’s such a great addition to the closet and for less than $20 it’s easy on the pocketbook too!  And now I have another thing checked off my list!

Wednesday, August 26, 2015

DESIGNS ONLINE & BACK TO SCHOOL SPECIALS

Oh snap!  Just like that summer is coming to an end.  It’s definitely been a crazy one here!  I have been wrapping up several projects and starting some new ones so I apologize if I have been a little distant lately.  Needless to say I have a lot to share with you!

One major change around our house is that my sweet not-so-baby-anymore Oliver had his first day of Pre-K on Monday and Owen started in the toddler class at the same school. It’s not always fun saying goodbye to summer and having to adjust to school schedules but one great thing about this time of year is the Back to School deals!  At the end of this post I will be offering one myself!

Today I am going to share a before and after of a Home Office Virtual Design Board I completed for the Phillips.  They bought a new home earlier in the year and contacted me to design their Family Room, Dining Room and Home Office.  In the office they wanted some guidance but did not necessarily need me to provide the full service design of installing and accessorizing the space so a Virtual Design Board was the perfect option!

A great way to describe their sense of style is mid-century modern combined with some industrial pieces using fun, bright colors.  They are anything but a boring couple and their style truly expresses it!

Here is the Virtual Design Board I created for their Home Office.


Since the room is directly to your right when you enter their home it definitely needed a punch!  Something to grab your attention!  So I selected a colorful rug and a stencil from Cutting Edge Stencils that is a geometric pattern.  I recommended that they use a dark gray flat paint for the background and use the same dark gray paint for the stencil in a high gloss finish to give it a tone on tone feel.  It needed something but since the rug is quite a statement itself the wall did not need to be too in your face!

Since they both use the office for different purposes we opted for his and hers desks.  They are from the same collection but a larger and smaller version.  And although their twins were only born a few weeks ago, I added a gray table to go in between the two desks so eventually they can use the space as well.

Here are the before pictures of the office.


And now the good part...the after pictures. 


Didn’t they do a GREAT job?!?  I don't always get to see these come to life so I was thrilled to get to see it in person!  And yes…he painted the accent wall himself!!  AMAZING!!

So if you like to DIY but need some design direction a Virtual Design Board is the way to go!  They are also very budget friendly…which is what I’m all about!  And for a Back to School special I will give the first 5 people that sign up for a Virtual Design Board $25 off!  Email me at tessa@interiorsbytessa.com for more information.